Back to Basics: Ferrite Beads

Easily one of the most misunderstood parts out there. Folks use them as a magic dust to sprinkle it here and there in the circuit without really understanding its use case. These are very specific, frequency-dependent resistors that you place on purpose, and only after you know what noise you are after. Let’s discuss this today.

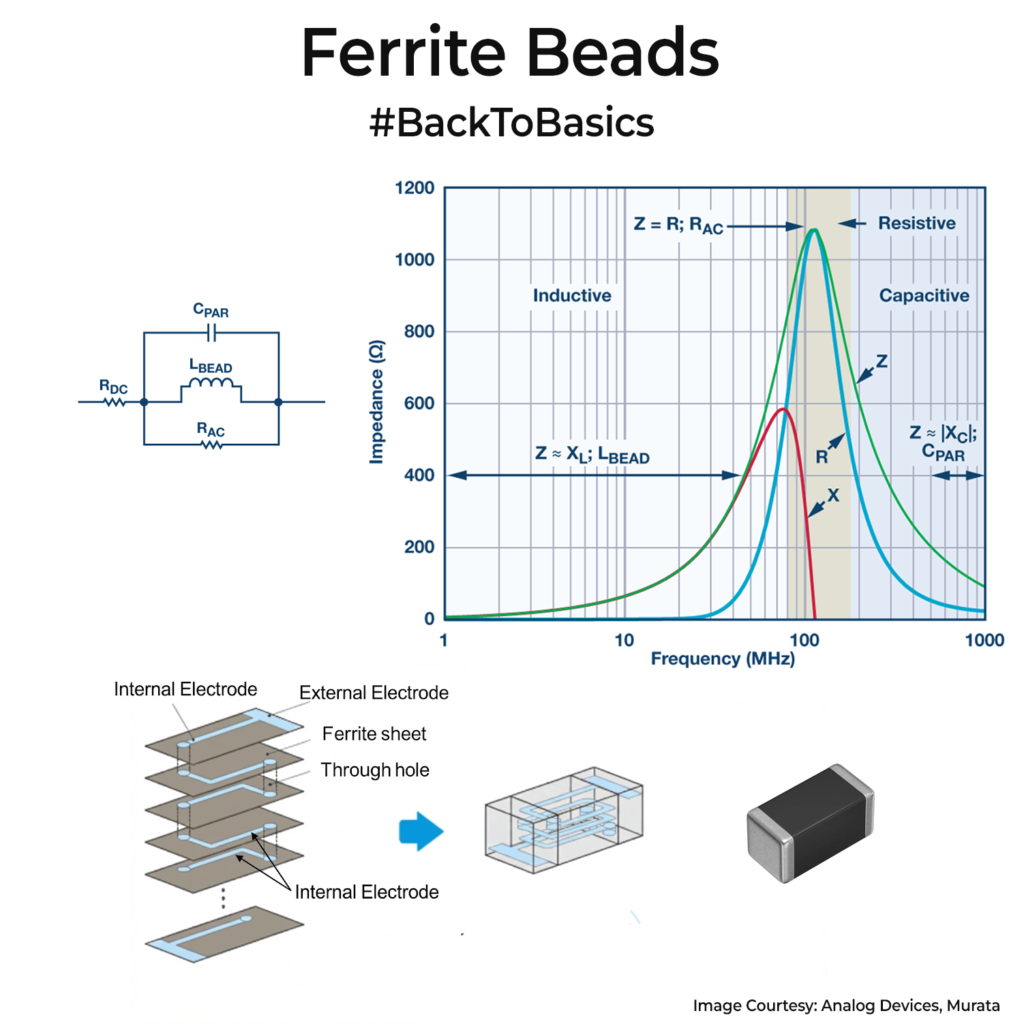
A ferrite bead is a small piece of ferrite ceramic with a conductor through it. In most SMD beads, it’s built as multiple layers of ferrite with metal electrodes, arranged, so the current still passes through ferrite material along its path.

At DC and low frequency, it looks almost like a short (10-300 mΩ range). As frequency rises, its impedance rises first because of inductance. Then the ferrite losses kick in, and the impedance becomes mostly real resistance, so RF energy turns into heat. At still higher frequency, the parasitic capacitance dominates, and the impedance  falls again. That is why you see datasheet impedance curve has a hump.

You use beads when you want to block high-frequency noise without isolating DC. Common cases are splitting a noisy digital 3.3V rail from a quieter analog 3.3V rail, feeding an RF block, cleaning up sensor power, or removing EMI on a cable line together with a shunt capacitor(Check older posts for more details on this).

A ferrite bead datasheet usually starts with a headline like “600Ω @ 100MHz”. That number is the bead’s impedance measured at one test frequency, and the graph beside it shows the full impedance vs frequency curve. Use that curve to match your noise band. If your noise issue is at 10MHz or 500MHz, adding this ferrite bead is useless. To find your noise band, use a near-field probe or spectrum analyser to see the spikes.

Also watch the DC bias. A 1A load can push the ferrite toward saturation and cut the impedance drastically. Also ensure that the ferrite bead can handle the heat when a large current passes through it. It will cause a voltage drop in the rail too. Most people forget to size the bead it correctly for power.

If you liked the post, Share it with your friends!

Back to Basics: Rail to Rail Opamps

Today we discuss one of the most basic characteristic of an opamp.

Rail to Rail opamp purely means an opamp whose input and output stages are designed to operate with signal voltages that are very close to both power supply rails under specified conditions. Meaning on a ±5V supply a rail to rail opamp might accept inputs from about −4.9V to +4.9V and drive outputs from about −4.95V to +4.95V into a light load, instead of being limited to something like−4.3V to 4.7V like a non-rail-to-rail opamp.

The key spec behind this is the common-mode input voltage(the voltage that is sitting on both inputs) range. If the datasheet says Vcm = V− to V+ + 0.1V, the input really reaches both rails (and a bit beyond). If it instead says Vcm = V− to V+ − 1.2V on ±5V, the input is valid from −5V to only +3.8V, so it is rail to negative rail, not truly rail to rail. Whenever you pick an opamp, this single line tells you how close your real circuit can get to each rail.

You also need to watch the output swing. The datasheet tells you how close the output can get to each rail at a given load. Into 10kΩ it may sit a few tens of millivolts away. Into 1kΩ that gap can jump to a few hundred millivolts.

The rule of thumb I try to follow is to keep signals at least 0.1V inside each rail, unless the graphs clearly prove better. On a 3.3V front end, I budget 0.1V to 3.2V as the working range and treat anything closer as margin.

When you pick a device, filter by supply and package, then read the common mode range and the output swing at your load. Only after that, think about offset and noise. This habit avoids parts that look fine, but quietly clip the last few millivolts.

A mostly unknown fact is that many rail to rail input opamps use two input pairs that hand over near mid-supply, so their worst distortion often appears around mid-scale instead of at the rails.

If you liked the post, Share it with your friends!
1 3 4 5 6 7 74